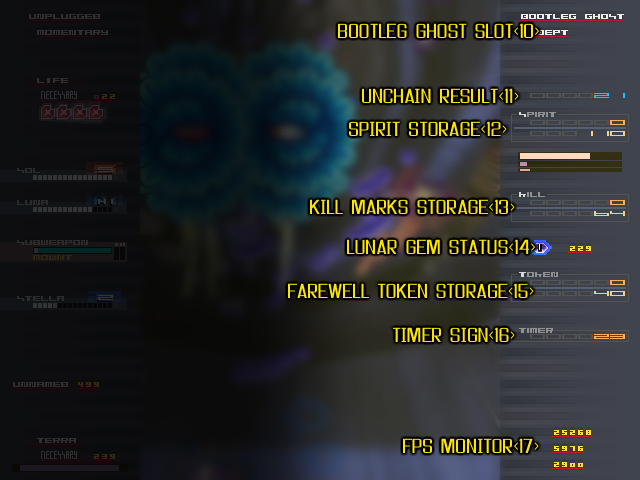
 | (10)BOOTLEG GHOST: |
 | ASPIRANT |
|
The sign of one with ambitions. Does not grant much protection. Of course, this also means it should not get in the way. Will only trigger autorejection if SOL level is at maximum and the EXECUTOR has fewer than starting (4) lives. Triggers up to three times per stage. |
| SOLIDSTATE |
|
A defensive mechanism equipped with a sparkling barrier of spray. Functions whenever discharge is available (SOL level 3 or higher). It protects the EXECUTOR when attacked, sacrificing SOL to preserve the LIFE. Penalties from being struck are different if the EXECUTOR is saved by SOLIDSTATE. Also, perhaps as a sign of its underlying weakness, despite its name, slightly more TERRA will be lost after completing each stage. Rather than simply being easier, it is best to think of it as an aid on the journey to mastery. Note that it is usable at SOL level 2 for FOSSIL MAIDEN, who has only 2 levels. Expands the autorejection abilities of the EXECUTOR with its lower SOL requirement (level 3 or higher, for most EXECUTORs). Usable up to three times per segment. |
| ADEPT |
|
Equipment for the adept, as its name implies. Does not normally have a suppression radius. The radius is only action while the shot button is held.  No suppression radius without deliberate activationNo autorejection capability (conserves SOL, thus aiding in maintaining power) No suppression radius without deliberate activationNo autorejection capability (conserves SOL, thus aiding in maintaining power)It does lend several advantages, though. Suppression radius activation time can be shortenedConvenient dodging while not firing (defends against slowing bullets)Grazing area is large even while not firingDesigned for EXECUTORs skilled at evasion and defense, and should allow the tapping of further power. However, for FOSSIL MAIDEN, who has no suppression radius when not using her Misteltoe to begin with, this talisman will probably provide little benefit. |
| (11)UNCHAIN: |
| (12)SPIRIT(s): |
The SPIRITs--sprites, essence, purity--act as the hemolymph of the targets, providing motive force.
The number collected serves as a measure of the spoils gained throughout the mission.
Gained for the most part from contacting (destroying/approaching/touching) SPIRIT sources.
|
Gained automatically from destroyed targetsMore are gained by firing into crowds (increased by hitting several targets at once)Gained by collecting golden relicsGained by neutralizing destructable projectilesGained by approaching certain enemy bullets (such as needles--interference from grazing releases SPIRITs)Gathered automatically from the surroundings in proportion to STELLA level
|
0-9999 (shows no number)
0-99999 (shows as 1~9 on the lower gauge)
0-999999 (shows as 1~99 on the lower gauge)
Even gradual changes with no sudden large increases can be seen, so it should serve well in estimating the turnaround.
| (13)KILL(s): |
The number destroyed serves as a measure of success in the mission.
Rises when the EXECUTOR destroys targets (including multiple parts of a single PRAYER).
|
Rises by 1 per target destroyed
|
(14)LUNAR GEM:
and roughly the number of fragments required for the next growth level.
The counter falls, approaching the next level, upon picking up LUNA crystals and LUNA droplets.
It will increase by 1 if a LUNA crystal falls off the screen.
Once it has reached maximum (16 crystals), maturity will no longer fall upon missing a crystal.
The numbers in this state glow blue, unlike the countdown to the next maturity level.
| (15)TOKEN(s): |
Has been used as a measure of skill among EXECUTORs since ages past.
|
Rises (a lot) when picking up LUNA relics from destroyed target partsRises when picking up LUNA relics from target bullets converted upon killing target partsRises (a little) when picking up LUNA droplets which gush from nearby target bullets
|
These three components are shown in two gauges.
The upper shows the tokens collected up to the start of the current segment, while the lower shows the tokens collected in the current segment.
(The lower is finalized and added to the upper after the boss.)
| (16)TIMER: |
| (17)FPS: |
The second shows the number of screen refreshes per second.
It is multiplied by 100, and so 6000 means 60fps (the recommended frequency).
If it is not running near 6000, you may want to check your computer's display and hardware settings.
If it is much lower than 6000, the game's processing will be affected.
Changing graphics or video card settings may help.
Monitor Vblank is best at 60.0Hz.
# Setting the resolution to 640*480 (the resolution used for fullscreen)
# and checking the monitor settings should let you know.
59.9Hz is fine, but at 59.8Hz or 60.2Hz
the game may be severely affected.
In these cases it may help to run the game in
windowed mode, at the resolution that provides 60.0Hz.
# If it still isn't synced at the opening menu in windowed mode, it will try Vsync
(The timer is usually correct, but it may have issues)
Though sounds may in places be replayed, it shouldn't break outright.
The third number shows the maximum number of objects on the screen.